|
|
因为最近我们在开发一个基于 FUSE 的高性能分布式文件系统“CurveFS”,所以涉及到用户态文件系统中的文件权限管理。
问题一:root 用户也无法访问挂载点
在实现了 CurveFS 的 demo 后,在测试过程中发现,client mount 进程是哪个用户启动的就只有该用户(filesystem owner)可以访问该目录,即使挂载点mode是777。
# process owner is curve
curve@test:/tmp$ ls -l
drwxrwxrwx 0 root root 0 Nov 9 2021 fsmount
# root can not access mountpoint
root@test:/tmp# ls -l
ls: cannot access 'fsmount': Permission denied
d????????? ? ? ? ? ? fsmount查阅资料发现这是 fuse 的一种安全策略,默认是只有 filesystem owner 拥有该文件系统的访问权限,如果想要其他用户有权访问,需要在挂载参数中指定 ‘-o allow-root’ 或 '-o allow-other' 以允许相应用户有权访问该文件系统,如果挂载者不是root还需要在 /etc/fuse.conf(/usr/local/etc/fuse.conf)中增加配置项“user_allow_other”(该配置项是无值的),详见libfuse官方文档。
问题二:文件系统访问控制是在哪一层实现的?
测试curvefs,发现文件系统链路默认是没有做权限控制。
curve@test:/tmp$ ls -l
drwxrwxrwx 0 root root 0 Nov 9 2021 fsmount
curve@test:/tmp/fsmount$ touch file
curve@test:/tmp/fsmount$ ls -l
total 0
-rw-r--r-- 0 curve curve 0 Nov 9 2021 file
curve@test:/tmp/fsmount$ echo "hello" > file
curve@test:/tmp/fsmount$ cat file
hello
# change owner
test@test:/tmp/fsmount$ echo "world" >> file
test@test:/tmp/fsmount$ cat file
hello
worldfuse 默认是不会检查文件访问权限的,它允许在文件系统中自由的实现访问控制策略。挂载参数 ‘default_permissions’ 用于启用内核自己的权限检查,而不是将权限检查推迟到文件系统,除了文件系统的权限检查之外,内核还会进行检查,两者都必须成功才能允许操作,内核执行标准的 UNIX 权限检查。
未实现任何权限检查的文件系统通常应该启用此选项,可与参数‘allow_other’一起达到共享文件访问控制。
# mount with default_permissions and allow_other
root@test:/tmp# ls -l
drwxr-xr-x 0 root root 0 Nov 9 2021 fsmount
root@test:/tmp# cd fsmount/
root@test:/tmp/fsmount# touch file
root@test:/tmp/fsmount# echo "hello" >> file
root@test:/tmp/fsmount# cat file
hello
# other user
curve@test:/tmp/fsmount$ echo "world" >> file
-bash: file: Permission denied
# chmod 777
root@test:/tmp/fsmount# chmod 777 hello.txt
# after chmod
curve@test:/tmp/fsmount$ echo "world" >> file
curve@test:/tmp/fsmount$ cat file
hello
world文件系统权限管理
// example in linux
// 文件类型-文件属主权限-文件属组权限-文件其他用户权限-链接数-属主-属组-大小-最近修改时间-文件名
drwxr-xr-x 3 curve curve 4096 Jul 16 10:41 .
drwx------ 17 curve curve 4096 Jul 16 10:38 ..
drwxr-xr-x 2 curve curve 4096 Jul 16 10:39 directory
-rw-r--r-- 2 curve curve 0 Jul 16 10:40 file
-rw-r--r-- 2 curve curve 0 Jul 16 10:40 hardlink
lrwxrwxrwx 1 curve curve 4 Jul 16 10:41 softlink -> file文件类型
| 文件类型标识 | 文件类型 | | - | 普通文件 | | d | 目录文件 | | l | 符号链接 | | s | 套接字(伪文件) | | b | 块设备(伪文件) | | c | 字符设备(伪文件) | | p | 管道(伪文件) |
文件权限
文件权限分为三段:分别对应文件“属主权限”、“属组权限”、“其他用户权限”
| 权限标识 | 权限类型 | | - | 无权限 | | r | 读权限4 | | w | 写权限2 | | x | 执行权限1 |
特殊权限(SUID, SGID, STICKY)
SUID:仅设置在可执行的文件上。默认情况下,当用户执行此类可执行文件时,被发起的进程的所有者不是进程发起者,而是可执行文件的所有者;换句话说,进程以所有者的身份运行。权限所显示的位置在文件的属主的权限位中的执行权限位上,如果属主本来就具有执行权限,则显示为“s”,如果本来没有执行权限,则显示为“S”。
# 管理SUID权限:
# 符号标识法:chmod u+s FILE
# 数字标识法:chmod 4755 FILE
curve@test:~/tmp$ ls -l
total 0
-rwxr-xr-x 1 curve curve 0 Jul 29 10:37 file1
-rw-r-xr-x 1 curve curve 0 Jul 29 10:37 file2
curve@test:~/tmp$ chmod u+s file1
curve@test:~/tmp$ chmod 4655 file2
curve@test:~/tmp$ ls -l
total 0
-rwsr-xr-x 1 curve curve 0 Jul 29 10:37 file1
-rwSr-xr-x 1 curve curve 0 Jul 29 10:37 file2SGID:可设置在可执行文件或目录的属组权限位的执行权限上。如果某个目录设置了SGID权限,并且对于某些用户有写权限,则所有在此目录创建的新文件和目录的所属组均为其父目录的所属组,而并非进程发起者的主要组。SGID权限的显示位置在文件的属组权限位上的执行权限上;如果属组本来就有执行权限。则显示为"s",否则,就显示为“S”。
# 管理SGID权限:
# 符号标识法:chmod g+s DIR
# 数字标识法:chmod 2770 DIR
curve@test:~$ ls -l
drwxr-xr-x 2 curve curve 4096 Jul 29 10:44 tmp
curve@test:~$ chmod g+s tmp
curve@test:~$ ls -l
drwxr-sr-x 2 curve curve 4096 Jul 29 10:44 tmp
curve@test:~$ touch ./tmp/file1
# change to root
root@test:~# touch ./tmp/file2
root@test:~# ls -l
total 0
-rw-r--r-- 1 curve curve 0 Jul 29 10:47 file1
-rw-r--r-- 1 root curve 0 Jul 29 10:47 file2STICKY:仅设置在目录的其他用户权限位的执行权限上。如果在某个目录上的权限设置为多个用户都拥有写权限,那就意味着凡是拥有写权限的用户都能直接管理该目录中的所有文件名,包括改名文件及删除文件名等操作;因此需要在这样的目录上设置STICKY特殊权限;如果此类目录设置了STICKY,则所有用户即便拥有写权限,也仅能删除或改名所有者为其自身的文件。
# 管理STICKY权限:
# 符号标识法:chmod o+t DIR
# 数字标识法:chmod 1777 DIR
curve@test:/tmp$ ls -l | grep stmp
drwxrwxrwx 2 curve curve 4096 Jul 29 11:02 stmp
curve@test:/tmp$ chmod o+t stmp
curve@test:/tmp/stmp$ ls -l
total 0
-rw-r--r-- 1 curve curve 0 Jul 29 11:03 file
twat@test:/tmp/stmp$ rm -f file
rm: cannot remove 'file': Operation not permitted文件默认权限umask
为什么默认创建的目录权限为755,文件为644? 在linux系统中,创建一个新的文件或者目录时,这些新的文件或目录都会有默认的访问权限 umask 命令与文件和目录的默认访问权限有关,umask 值则表明了需要从默认权限中去掉哪些权限来成 为最终的默认权限值。
root@test:~# umask 0022
默认目录权限为777,文件为666,经过与umask作用,最终权限为755、644
Windows 系统中,新建的文件和目录时通过继承上级目录的权限获得的初始权限,而 Linux 不同,它是通过使用 umask 默认权限来给所有新建的文件和目录赋予初始权限的。
/etc/login.defs
# UMASK is the default umask value for pam_umask and is used by
# useradd and newusers to set the mode of the new home directories.
# 022 is the "historical" value in Debian for UMASK
# 027, or even 077, could be considered better for privacy
# There is no One True Answer here : each sysadmin must make up his/her
# mind.
...
UMASK 022
...文件系统用户权限管理
用户&用户组
- 用户的角色是通过UID和GID在系统内进行识别的,username 和 group name是便于人工记忆,它们和uid、gid是一一对应的关系。
- UID(User Identify) GID(Group Identity)
- 超级用户: UID:0 默认是root用户,UID为0的用户为超级用户,
- 虚拟用户: UID:1~499 与真实普通用户区分开来,这类用户最大的特点是安装系统后默认就会存在,且默认情况大多数不能登录系统
- 普通用户: UID:500~65535 具备系统管理员root的权限的运维人员添加的,权限很小,一般用sudo管理提权
- 用户和用户组的关系: 一对一、一对多、多对一、多对多
- 创建目录、文件时设置uid、gid、mode信息
- client 对文件操作前进行鉴权
- 实现 chown chmod 进行权限更改
message Inode {
required uint64 inodeId = 1;
required uint32 fsId = 2;
required uint64 length = 3;
required uint32 ctime = 4;
required uint32 mtime = 5;
required uint32 atime = 6;
required uint32 uid = 7;
required uint32 gid = 8;
required uint32 mode = 9;
required sint32 nlink = 10;
...
}
从fuse接口获取文件系统操作请求的用户uid gid信息
struct fuse_ctx {
uid_t uid;
gid_t gid;
pid_t pid;
mode_t umask;
};
// in fuse_lowlevel.h is
const struct fuse_ctx *fuse_req_ctx(fuse_req_t req)ACL(Access Control Lists)的管理
访问控制列表(ACL 或 POSIX ACL)是多用户系统的附加安全控制功能。 与基本的 POSIX RWX 位相比,POSIX ACL 有助于对文件系统权限进行更灵活、更细粒度的控制。可以针对用户(User)、群组(Group)、默认属性掩码(umask)进行设置。
ACL 是 Linux 系统权限额外支持的一项功能,需要文件系统的支持,例如:ReiserFS , EXT2 , EXT3 , EXT4 , JFS , XFS 等都支持 ACL 功能。使用 ‘dumpe2fs’ 命令查看你的ACL功能是否启用:
# 默认启用acl功能
root@test:~# dumpe2fs -h /dev/sdk
dumpe2fs 1.43.4 (31-Jan-2017)
Filesystem volume name: <none>
Last mounted on: /data
Filesystem UUID: 5ba783e9-44bd-49ce-b8bc-b7ba0ef33531
Filesystem magic number: 0xEF53
Filesystem revision #: 1 (dynamic)
Filesystem features: has_journal ext_attr resize_inode dir_index filetype needs_recovery extent 64bit flex_bg sparse_super large_file huge_file dir_nlink extra_isize metadata_csum
Filesystem flags: signed_directory_hash
Default mount options: user_xattr acl
...
# 如果没有开启acl需要重新挂载并指定acl挂载参数
mount -o remount, acl [mount point]
# ACL 命令包括三个, getfacl --help 查看具体用法
# getfacl: 取得文件或目录的ACL设置信息
# setfacl: 设置文件或目录的ACL设置信息
# chacl: 改变文件和目录的Access ACL and Default ACL
root@test:~# getfacl --help
Usage: getfacl [-aceEsRLPtpndvh] file ...
-a, --access display the file access control list only
-d, --default display the default access control list only
-c, --omit-header do not display the comment header
-e, --all-effective print all effective rights
-E, --no-effective print no effective rights
-s, --skip-base skip files that only have the base entries
-R, --recursive recurse into subdirectories
-L, --logical logical walk, follow symbolic links
-P, --physical physical walk, do not follow symbolic links
-t, --tabular use tabular output format
-n, --numeric print numeric user/group identifiers
-p, --absolute-names don&#39;t strip leading &#39;/&#39; in pathnames
-v, --version print version and exit
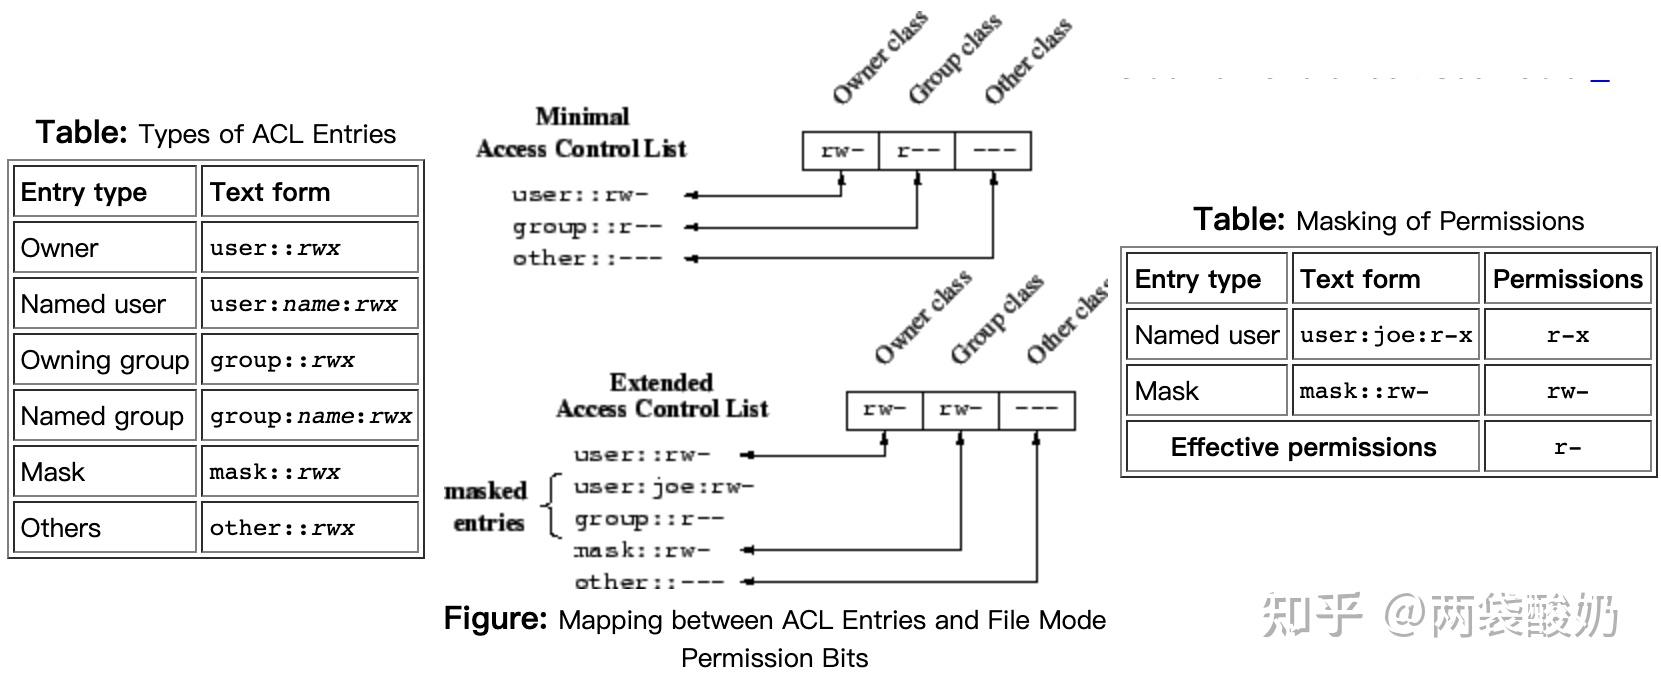
-h, --help this help textACL的使用规则和原理:
ACL是由一系列的 Access Entry 所组成的,每一条 Access Entry 定义了特定的类别可以对文件拥有的操作权限。Access Entry有三个组成部分:Entry tag type, qualifier (optional), permission。
# example an Access Entry
user:john:rw-
group:dev:r--
1. Entry tag type:
ACL_USER_OBJ:相当于Linux里file_owner的permission
ACL_USER:定义了额外的用户可以对此文件拥有的permission
ACL_GROUP_OBJ:相当于Linux里group的permission
ACL_GROUP:定义了额外的组可以对此文件拥有的permission
ACL_MASK:定义了ACL_USER, ACL_GROUP_OBJ和ACL_GROUP的最大权限
ACL_OTHER:相当于Linux里other的permission
2. Qualifier
特定用户和用户组,可以省略
3. Permission
RWX
# test set acl
# 默认acl.test文件只具有基本的权限规则
root@test:/tmp# ls -l | grep acl.test
-rw-r--r-- 1 root root 0 Jul 25 12:13 acl.test
root@ptest:/tmp# getfacl acl.test
# file: acl.test
# owner: root
# group: root
user::rw-
group::r--
other::r--
# 设置curve用户对该文件具有写(w)权限
# before set
curve@test:/tmp$ echo &#34;hello&#34; >> acl.test
-bash: acl.test: Permission denied
# set acl
root@test:/tmp# setfacl -m u:curve:rw- acl.test
root@test:/tmp# ls -l | grep acl.test
-rw-rw-r--+ 1 root root 0 Jul 25 12:13 acl.test
root@test:/tmp# getfacl acl.test
# file: acl.test
# owner: root
# group: root
user::rw-
user:curve:rw-
group::r--
mask::rw-
other::r--
# after set
curve@test:/tmp$ echo &#34;hello&#34; >> acl.test
curve@test:/tmp$ cat acl.test
hello
设置完可以看到ls -l 显示权限时最后多了个‘+’号,表示有附件的权限设置;
getacl时多了一条access entry &#39;user:curve:rw-&#39;,表示在基本的Posix u/g/o权限之外增加的额外权限
mask::rw-: 它规定了ACL_USER,ACL_GROUP_OBJ和ACL_GROUP的最大权限
root@test:/tmp# getfacl -e acl.test
# file: acl.test
# owner: root
# group: root
user::rw-
user:curve:rw- #effective:rw-
group::r-- #effective:r--
mask::rw-
other::r--
root@test:/tmp# setfacl -m mask::r-- acl.test
root@test:/tmp# getfacl -e acl.test
# file: acl.test
# owner: root
# group: root
user::rw-
user:curve:rw- #effective:r--
group::r-- #effective:r--
mask::r--
other::r--
curve@test:/tmp$ echo &#34;hello&#34; >> acl.test
-bash: acl.test: Permission denied
# 注意:当添加了acl权限后,ls -l命令查看到的group权限是mask值,真实具有的权限需通过getfacl -e 查看
# 例如:mask值为rwx,但是真实具有的是r--
root@test:/tmp# setfacl -m mask::rwx acl.test
root@test:/tmp# ls -l
-rw-rwxr--+ 1 root root 6 Jul 25 12:20 acl.test
root@test:/tmp# getfacl -e acl.test
# file: acl.test
# owner: root
# group: root
user::rw-
user:curve:rw- #effective:rw-
group::r-- #effective:r--
mask::rwx
other::r--
# Default ACL
# Default ACL是指对于一个目录进行Default ACL设置,并且在此目录下建立的文件都将继承此目录的ACL
root@test:/tmp# mkdir acl
root@test:/tmp# ls -l
drwxr-xr-x 2 root root 4096 Jul 25 12:59 acl
root@test:/tmp# getfacl -e acl
# file: acl
# owner: root
# group: root
user::rwx
group::r-x
other::r-x
# 设置Default acl
root@test:/tmp# setfacl -d -m u:curve:rwx acl
root@test:/tmp# ls -l
drwxr-xr-x+ 2 root root 4096 Jul 25 12:59 acl
root@test:/tmp# getfacl -e acl
# file: acl
# owner: root
# group: root
user::rwx
group::r-x
other::r-x
default:user::rwx
default:user:curve:rwx #effective:rwx
default:group::r-x #effective:r-x
default:mask::rwx
default:other::r-x
root@test:/tmp# cd acl
root@test:/tmp/acl# touch file
root@test:/tmp/acl# getfacl -e file
# file: file
# owner: root
# group: root
user::rw-
user:curve:rwx #effective:rw-
group::r-x #effective:r--
mask::rw-
other::r--
如何在用户态文件系统中实现 ACL
通过文件的扩展属性 xattr。
在 Linux 操作系统中,如果libattr 功能在内核设置中被打开, ext2 、 ext3 、 ext4 、 JFS 、 ReiserFS 以及 XFS 文件系统都支持扩展属性(简写为xattr, 详见man xattr)。任何一个普通文件都可能包含有一系列的扩展属性。每一个属性由一个名字以及与之相关联的数据所表示。其中名字必须为一个 字符串 ,并且必须有一个 命名空间 前缀标识符与一个点字符。目前存在有四种命名空间:用户命名空间、信任命名空间、安全命名空间以及系统命名空间。用户命名空间在命名或者内容上没有任何限制,系统命名空间主要被内核用于访问控制表上,目前Linux 的 ACL 存储实现就是基于这种扩展属性的。
libfuse 中的支持:fuse_common.h File Reference

总结
对于一个前期的用户态文件系统而言:
- 可以先不自己实现权限管理,使用‘default_permissions’ 和 ‘allow_other’的mount option 启用内核基于mode的权限控制。
- 新建rootinode mode = 1777(原因是设置STICKY,避免普通用户对非自己所属文件的删除)
- 这样达到的效果除了不支持 ACL 外与正常本地文件系统权限管理一致。
- 对应更加细粒度的权限控制,可以后续完善 ACL 的功能。
|
|


 发表于 2022-9-21 16:40:21